That Game

Developer Addon Documentation

Written by Reddrad || Version: Activation 1.X

1: Installing and Working With the Module

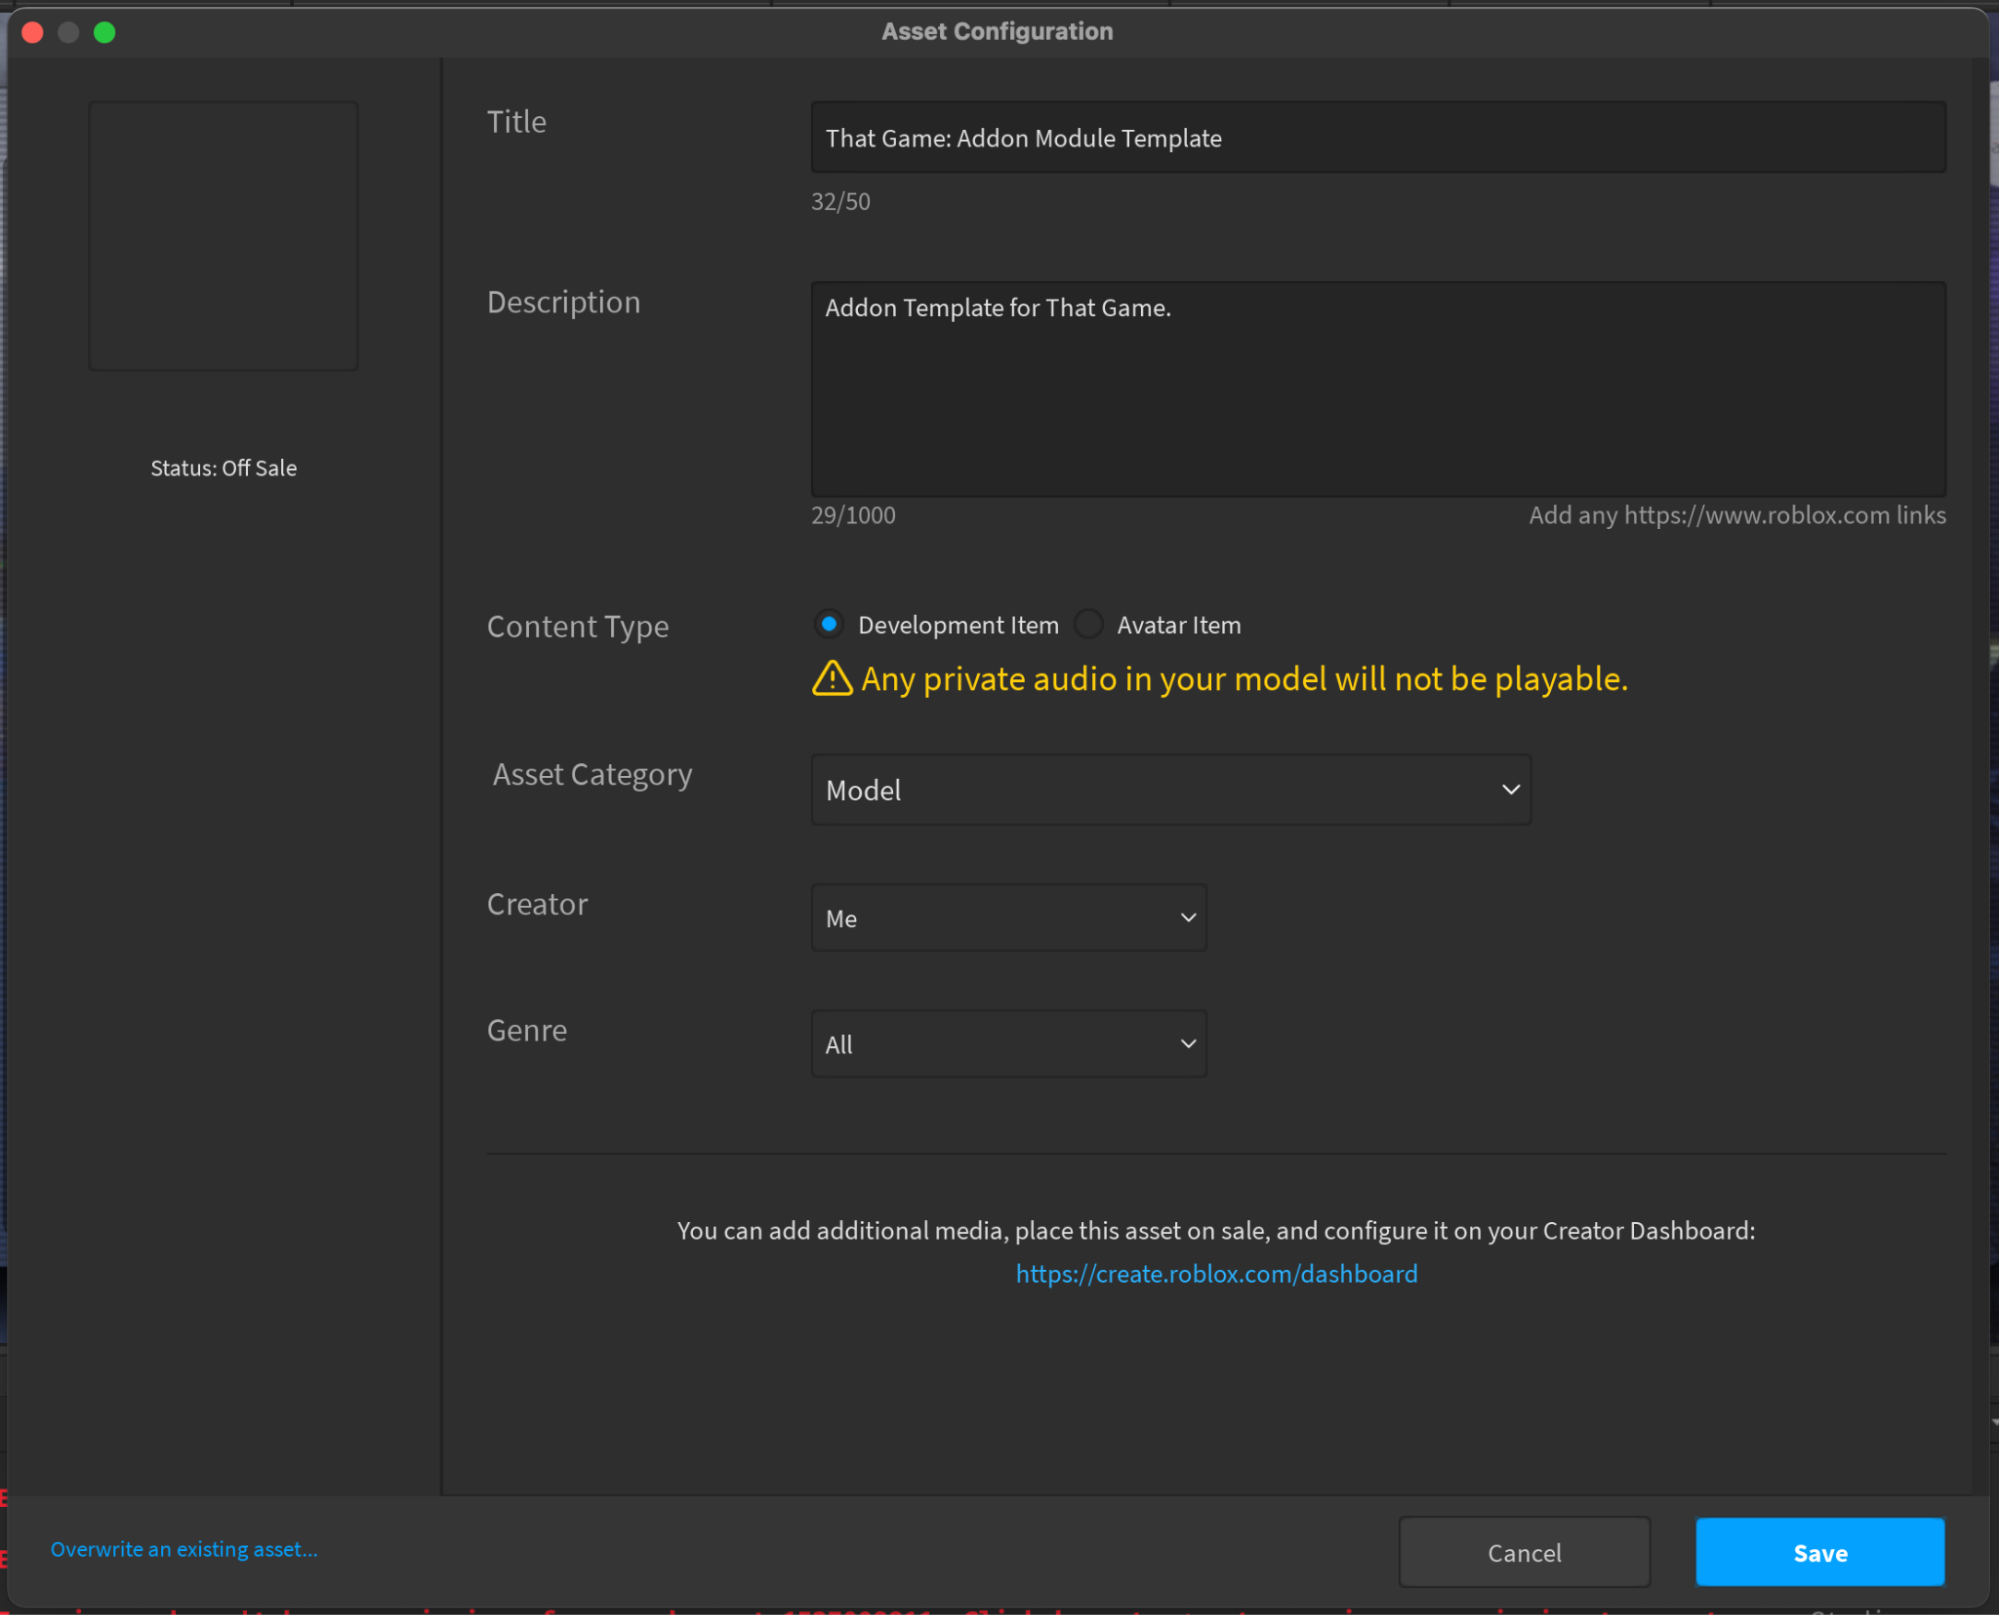
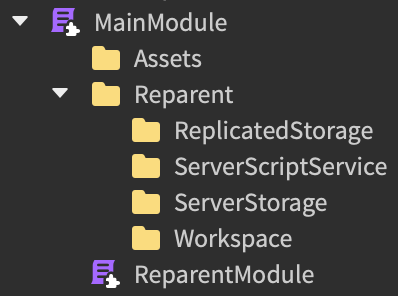
Before you can get to work on creating an Addon, it's essential that you get the Addon Module Template. Attempting to submit a self-made module will not work unless it is an exact recreation of the module template. The module in question should look like this once inserted into Roblox Studio:

Once your template is imported, you can begin to work on an Addon.

1.1: Functions

As of version Activation 1.0, there are two main functions, which you will need to use differently depending on your purposes.

module:MAIN_Prime() is the function that is only run once when the module is initially activated. Here is where things that you'd only want to occur once would happen. For example, replacing an asset in ReplicatedStorage would be done here.

module:MAIN_Prime_On_Workspace_Load() is the function that will usually have more substance. This function is run every time the workspace is loaded (alongside running by default via :MAIN_Prime()). This is useful for map additions, workspace alterations, or anything that will constantly be affecting or a part of the workspace.

module:MAIN_Remove() is the function that handles cleaning up the created mess when the module is unloaded or removed. Typically, a developer would put all of the created instances into an array, then run through the array using a for loop to destroy all instances once the removal function is called. You should consider what to put in which function whenever adding onto the module.

1.2: Built-in Functionality

Besides running :MAIN_Prime() upon being loaded, the module also automatically reparents anything within the module.Reparent folder. For example, anything within module.Workspace will automatically be placed into workspace without any code necessary.

[ * ] The Workspace folder has a special attribute which determines whether or not it should re-parent its children upon being loaded. By default, it's active.


[ * ] You can add extra folders that automatically reparent. Simply adding a folder known as the internal name of a service within the Reparent folder will automatically reparent the instance. Recommended to use with Lighting and other common services.


1.3: Custom Scripting

So long as you possess knowledge in scripting in Luau, you can add whatever you please to the aforementioned functions. You could use this to replace assets, create functional NPCs, or anything you can think of, really.

There are a few things you should know before attempting to code for your Addon:

Your code must follow Roblox Terms of Service.

You should try to make your code as stable as possible, as That Game is incredibly flexible, and can be transformed in a variety of ways.

Your code will be reviewed more extensively than other modules without custom code.

Your code should not be able to install backdoors or otherwise mess with That Game's server backend, including modifying datastores or sending messages to every server.


[ X ] : Your Addon privileges can be revoked for any reason at any time.

2: Publishing and Using your Addon

Once you've finished your Addon, you'll probably want to actually use it. Besides playtesting and showing it to friends, you may want to submit it for review, where it may be added to the official That Game Addon library for others to use.

2.1: Saving to Roblox

Saving to Roblox is relatively simple; first, right click on your module and click Save to Roblox..., which should bring up a menu. You'll want to configure your settings (ignoring Name and Description) to look something like this:

After clicking save, your asset will have been published to Roblox, but you need to publish it to the Roblox Marketplace. You'll want to click on the link that will bring you to the asset's configuration menu, and you'll need to check "Distribute on Creator Store" to be true:

[ ! ] Due to recent Roblox updates, your module will be scanned by Roblox's artificial intelligence as training data. There is no workaround for this.

Your Addon is now ready to be imported into That Game.

2.2: Playing on a Private Server

For playtesting and showing to friends, you're able to load any Addon, including your own that you just published. To import an Addon, open the spawn menu in a private server and click on "Addons". You should see a screen with this at the top:

Copy and paste the asset id. After unfocusing from the text box, you should see a confirmation box. If all of the data is accurate, click yea:

Your addon should appear in the list below:

Your Addon is now applied and ready for use.

[ * ] : Sometimes your Addon will error, but it will not be picked up. This is whenever one of your Addon's assets errors, not the MainModule itself. It's recommended you test your assets outside of That Game, using placeholders when necessary.

2.3: Submitting your Addon for Review

If you'd like to have your Addon added to the Addon catalog, you'll need to submit it for review. In That Game, open the Spawn Menu, open Addons, and click on Addon Publishing. You should see a screen that looks like this:

Insert the Addon ID, click yea if it's the correct ID, and you're done. Your Addon may take up to a few days to be moderated.
You should know that aside from following Roblox ToS, your Addon must also follow the following rules:

Your Addon may not use DataStoreService, MessagingService, or MemoryStoreService. Additionally, HttpService usage is moderated; your module may not do anything nefarious using HttpService, such as sending malicious data to a bot.

Your Addon may not do anything in the background that someone using your Addon may not know about (closet actions).

Your Addon may not use loadstring().

Your Addon may not restrict players from accessing essential functions (leaving the game, opening the chat, etc.).

Your Addon must use TextService for text moderation when appropriate.

Your Addon may not call require() with an asset id as an argument.


[ X ] : Failing to follow the rules may result in punishment up to a 365 day ban from submitting Addons.

3: Maintenance

Maintaining your Addon is important if you'd like it to stay functional. You won't need to update your module super often, as older versions will remain supported for as long as they're practical to support.

3.1: Saving to Roblox

The module's specific version is stored as a string value. Versions are organized as Version Name, Version Number, as in "Activation 1.0". "Activation 1.1" may be a small fix or rework a function, while "Renewal 2.0" may add completely new features.
Older versions will be supported until their support is manually cut off. You will be notified at least 30 days in advance prior to the discontinuation of a version.
You should not attempt to manually change the version string in your module, as it may lead to errors; simply re-import the newest version of the module.

3.2: Updating your Addon

Updating your Addon is a similar process to publishing it to Roblox. Right click on your Addon and click Save to Roblox... to bring up the publish menu, then click on "Overwrite an Asset" on the bottom left:

This will bring up a list. Select your module and click Save. Your Addon has been updated, and any new server created will be using the new version.

[ * ] : It's good practice to save older versions in case your newest version has a bug, so you can revert to an older version temporarily while you fix the bug.

3.3: Abandoned Addons

Should you decide to not update your Addon and let it go to an outdated version, it will be marked as Abandoned. Addons with this rank are considered deprecated, and will usually not work in new servers.
While anyone may fork your module at any time (see 3.4), it is actively encouraged if your Addon is abandoned. If you'd like to practice creating Addons, try forking an Abandoned Addon and converting it to a newer version.

[ ! ] : Abandoned Addons also are automatically revoked approval, meaning they'll be hidden from the Addon Browser. You must re-submit your Addon to have it re-added to the Addon Browser.

3.4: Forking Addons

Forking Addons is when you take an Addon you didn't make and modify it before re-importing it into That Game. Opening an Addon in Roblox Studio is simple: take an Addon's ID (visible on the Addon browser and current server's Addons list), and go to the URL https://create.roblox.com/store/asset/{ID} (replacing {ID} with your id). Save the module, open Roblox Studio, and import your saved module.
By modifying and publishing this new Addon, you have created a fork. While not required, it is recommended you credit the original creator of the Addon the fork is based on.

4: Miscellaneous Information

You should not rename anything that comes with the template, including the name of the parent ModuleScript (due to a Roblox limitation, ModuleScripts loaded with require({assetId}) must be named "MainModule").

Sounds and Animations you've made cannot innately be loaded into That Game due to a Roblox restriction. You should use public audios and avoid using animations (CFrames may work, though know that it will be very annoying to implement).

Addons will update often. If a feature you needed is properly implemented, it's recommended you replace the workaround with the new feature on the newer version.

The Addon System is currently on Version Activation 1.X. Avoid using earlier versions for newer Addons.

I don't know how to end the documentation. This is the end of the documentation. Was it obvious?

copyright me, 2024. copy and i kill you >:(